Tag Archives: networking

Unlocking a LUKS encrypted root partition remotely via SSH

If you are thinking on sending a new server to a remote datacenter for colocation or you have rented one or more servers in the cloud, probably you have thought that you would like to encrypt your server’s hard disk.

The problem is that if you encrypt the whole hard disk (the root partition) you will need some kind of KVM to type the password remotely every time the server is restarted … sure??? No!

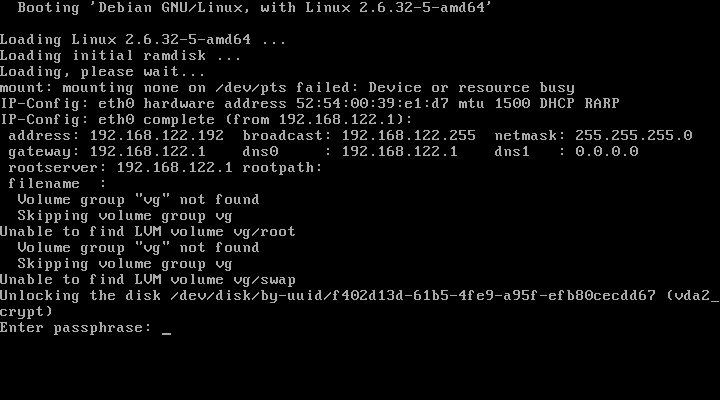
Thanks to this nifty trick, you can enter the password remotely during the boot process. The trick involves embedding a small ssh server (dropbear) in the initramfs that allows you to enter the password remotely for the root partition at boot time.

For those who are lucky enough to use Debian, the procedure is so simple and easy as ::

1) Install your server with the root partition encrypted.

2) Install the required packages:

apt-get install openssh-server dropbear busybox

3) Copy the SSH key that has been generated automatically

scp root@my.server.ip.addr:/etc/initramfs-tools/root/.ssh/id_rsa ~/id_rsa.initramfs

4) If your server gets the IP address automatically (DHCP) ignore this step, otherwise you have to specify the IP configuration at the Kernel boot line. To do this edit the file /etc/default/grub and define the line:

GRUB_CMDLINE_LINUX="ip=<client-ip>:<server-ip>:<gw-ip>:<netmask>:<hostname>:<device>:<autoconf>"

Using the format specified in the file Documentation/nfsroot.txt of the Linux kernel documentation. For example:

GRUB_CMDLINE_LINUX="ip=192.168.122.192::192.168.122.1:255.255.255.0::eth0:none"

Reload the grub configuration

update-grub

5) Reboot

reboot

6) And unlock remotely!

ssh -o "UserKnownHostsFile=~/.ssh/known_hosts.initramfs" \
	-i "~/id_rsa.initramfs" root@my.server.ip.addr \
	"echo -ne \"MyS3cr3tK3y\" >/lib/cryptsetup/passfifo"
And for those not lucky enough to use Debian, and also for those who have such luck, but want more details on this procedure, I am pasting here the archive cryptsetup/README.remote from Debian that I am sure that you will find very useful :)

$ zcat /usr/share/doc/cryptsetup/README.remote.gz

unlocking rootfs via ssh login in initramfs
-------------------------------------------

You can unlock your rootfs on bootup from remote, using ssh to log in to the
booting system while it's running with the initramfs mounted.


Setup
-----

For remote unlocking to work, the following packages have to be installed
before building the initramfs: dropbear busybox

The file /etc/initramfs-tools/initramfs.conf holds the configuration options
used when building the initramfs. It should contain BUSYBOX=y (this is set as
the default when the busybox package is installed) to have busybox installed
into the initramfs, and should not contain DROPBEAR=n, which would disable
installation of dropbear to initramfs. If set to DROPBEAR=y, dropbear will
be installed in any case; if DROPBEAR isn't set at all, then dropbear will only
be installed in case of an existing cryptroot setup.

The host keys used for the initramfs are dropbear_dss_host_key and
dropbear_rsa_host_key, both located in/etc/initramfs-tools/etc/dropbear/.
If they do not exist when the initramfs is compiled, they will be created
automatically. Following are the commands to create them manually:

# dropbearkey -t dss -f /etc/initramfs-tools/etc/dropbear/dropbear_dss_host_key
# dropbearkey -t rsa -f /etc/initramfs-tools/etc/dropbear/dropbear_rsa_host_key

As the initramfs will not be encrypted, publickey authentication is assumed.
The key(s) used for that will be taken from
/etc/initramfs-tools/root/.ssh/authorized_keys.
If this file doesn't exist when the initramfs is compiled, it will be created
and /etc/initramfs-tools/root/.ssh/id_rsa.pub will be added to it.
If the latter file doesn't exist either, it will be generated automatically -
you will find the matching private key which you will later need to log in to
the initramfs under /etc/initramfs-tools/root/.ssh/id_rsa (or id_rsa.dropbear
in case you need it in dropbear format). Following are the commands to do the
respective steps manually:

To create a key (in dropbear format):

# dropbearkey -t rsa -f /etc/initramfs-tools/root/.ssh/id_rsa.dropbear

To convert the key from dropbear format to openssh format:

# /usr/lib/dropbear/dropbearconvert dropbear openssh \
	/etc/initramfs-tools/root/.ssh/id_rsa.dropbear \
	/etc/initramfs-tools/root/.ssh/id_rsa

To extract the public key:

# dropbearkey -y -f /etc/initramfs-tools/root/.ssh/id_rsa.dropbear | \
	grep "^ssh-rsa " > /etc/initramfs-tools/root/.ssh/id_rsa.pub

To add the public key to the authorized_keys file:

# cat /etc/initramfs-tools/root/.ssh/id_rsa.pub >> /etc/initramfs-tools/root/.ssh/authorized_keys

In case you want some interface to get configured using dhcp, setting DEVICE= in
/etc/initramfs-tools/initramfs.conf should be sufficient.  The initramfs should
also honour the ip= kernel parameter.
In case you use grub, you probably might want to set it in /boot/grub/menu.lst,
either in the '# kopt=' line or appended to specific 'kernel' line(s).
The ip= kernel parameter is documented in Documentation/nfsroot.txt in the
kernel source tree.


Issues
------

Don't forget to run update-initramfs when you changed the config to make it
effective!

Collecting enough entropy for the ssh daemon sometimes seems to be an issue.
Startup of the ssh daemon might be delayed until enough entropy has been
retrieved. This is non-blocking for the startup process, so when you are at the
console you won't have to wait for the sshd to complete its startup.


Unlocking procedure
-------------------

To unlock from remote, you could do something like this:

# ssh -o "UserKnownHostsFile=~/.ssh/known_hosts.initramfs" \
	-i "~/id_rsa.initramfs" root@initramfshost.example.com \
	"echo -ne \"secret\" >/lib/cryptsetup/passfifo"

This example assumes that you have an extra known_hosts file 
"~/.ssh/known_hosts.initramfs" which holds the cryptroot system's host-key,
that you have a file "~/id_rsa.initramfs" which holds the authorized-key for
the cryptroot system, that the cryptroot system's name is
"initramfshost.example.com", and that the cryptroot passphrase is "secret"

-- <debian@x.ray.net>, Wed, 30 Sep 2009

RFKill Applet for GNOME

I don’t like to use wireless devices if I can avoid them, I am a bit paranoid with this things and also I have empirically checked that always that I use the wireless of my laptop for a long time I end with headaches. If you are worried about this too I encourage you to watch the documentary “surrounded by waves” (just google it)

And one of the things that I miss on my Asus laptop is that it lacks of a button switch for turning on / off the wireless and bluetooh devices. Months ago I discovered the rfkill utility (package wireless-tools on Debian/Ubuntu) and I loved it. I used to disable or enable the wireless devices from the terminal with this utility, but soon I realized that it was not comfortable to open a terminal and run the commands each time.

So as part of my hackfest time here at Igalia I wrote an applet for GNOME that lets the user to disable or enable the emission of radiation from RF devices with a simple click on the applet icon. I took the inspiration for this from the GNOME power manager inhibit applet.

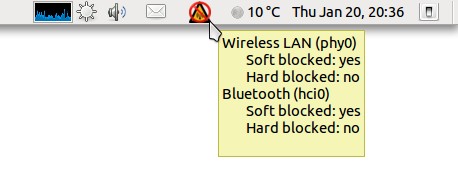
It also polls the system for the status of the RF devices and updates the icon showed, so it works also as a notification applet that will display the emitting icon if only one of the RF devices of your system is activated and the inhibited icon if all RF devices are blocked. Finally, if a problem is found or you don’t have RF devices on your system then it will display the unknown icon.

GNOME RFKill Applet

You can get it from gitorious.

I hope you find it useful 😉

Auth External: the Swiss Army Knife of Apache Auth

When you need to deploy a custom, weird or non typical Auth schema with Apache, knowing about the Auth External module can save you tons of time.

It is is commonly deployed along with pwauth for allowing unix users to authenticate against Apache, but this only one case use. Actually it can be used for almost any Auth setup that you can imagine.

The main idea behind it is very simple and powerful, it delegates Apache authentication on any program or script that you want. Simply it will feed your program with the user/password variables along other interesting variables like IP, cookies, URI, etc. and your program must return zero if the user is allowed to access or non-zero otherwise.

I will show you a simple example.

” I have my home server where I run an LDAP directory with some users and I also have a remote server in a hosting company where I want to allow the users of my LDAP directory to access some https directory protected by the Apache authentication.

Accessing the LDAP directory from the remote server is not an option because I have a firewall protecting it and I can’t/don’t want to do such a thing. And configuring an slave LDAP server on the remote server is even a worse option.”

So here is when Auth external comes to rescue.

On my home server I configure a dummy https virtual host that authenticates users via the local LDAP

<VirtualHost *:443>
    
    SSLEngine on
    
    ServerName   dummy-https.homeserver.com
    ServerAdmin  clopez@igalia.com
    
    TransferLog  /var/log/apache2/dummy-https-access.log
    ErrorLog     /var/log/apache2/dummy-https-error.log
        
    <Directory /var/www/empty>
        AuthName Auth
        AuthType Basic
        AuthBasicProvider ldap
        AuthzLDAPAuthoritative On
        AuthLDAPURL "ldap://localhost/dc=homeserver,dc=com?uid"
        AuthLDAPGroupAttribute uniqueMember
        AuthLDAPGroupAttributeIsDN On
        Require valid-user
        Order allow,deny
        Allow from all
    </Directory>

</VirtualHost>

And on the remote server I just implement a very simple script that will read from stdin an user and password strings and will try to establish an https connection with my apache home server using the supplied credentials. It will return zero if it can get the connection, otherwise will return 1

#! /bin/sh
read user
read password
/usr/bin/curl -f -u "$user":"$password" https://dummy-https.homeserver.com >/dev/null 2>&1 || exit 1
exit 0

I saved this script as /usr/local/bin/home-ssl.sh and now I will install the auth external module and will enable it

apt-get install libapache2-mod-authnz-external
a2enmod authnz_external

Note: for Debian Lenny grab the backport’s package

And now I will configure the Apache virtual host with the auth external authentication:

<VirtualHost *:443>
    
    SSLEngine on
    
    ServerName   securearea.hostingprovider.com
    ServerAdmin  clopez@igalia.com
    
    TransferLog  /var/log/apache2/securearea.hostingprovider-access.log
    ErrorLog     /var/log/apache2/securearea.hostingprovider-error.log
      
    DocumentRoot /var/www/securearea
        
    <Directory /var/www/securearea>
        AuthType Basic
        AuthName "Restricted"
        AuthBasicProvider external
        AuthExternal home-ssl
        require valid-user
    </Directory>

    AddExternalAuth home-ssl /usr/local/bin/home-ssl.sh
    SetExternalAuthMethod home-ssl pipe

</VirtualHost>

In summary:

  • User access https://securearea.hostingprovider.com/
  • Apache@hostingprovider ask user for credentials
  • Apache@hostingprovider calls /usr/local/bin/home-ssl.sh and feed it with user credentials
  • /usr/local/bin/home-ssl.sh calls Apache@homeserver at https://dummy-https.homeserver.com
  • Apache@homeserver ask for user credentials to local LDAP database
  • If credentials are correct Apache@homeserver will allow /usr/local/bin/home-ssl.sh to access making it to return zero so the user will be allowed to access securearea at Apache@hostingprovider

Want to write an external authenticator? Here you have a quick howto Enjoy !

Review of X7SPA-HF : Loving IPMI and KVM over LAN

I am building a silent and eco-friendly (also electricitybill-friendly) Linux powered RAID5 NAS.  And in order to choose the CPU I read about the different low power CPU solutions and two different ones come to mind: Intel Atom and Via Nano. My first choice was Via Nano since it features 64-bit support and the wonderful PadLock engine that would allow me to get good transfer rates with crypted drives, but unfortunately, I could not find any fanless Via Nano motherboard with 4 SATA ports.

So I looked through Intel Atom D510 dual core 64-bit solutions and I found some motherboards with the specs I wanted, but one of them stood out especially on the other because it was designed by Supermicro (a server and high-end workstation manufacturer) and it has two Gigabit adapters so I can also use the NAS as a nice router/firewall.

There was two models of this board. The  X7SPA-HF is the same that the X7SPA-H but featuring IPMI with KVM-over-LAN for only 20 bucks more. I never heard of the IPMI technology so I read a little about it and finally I decided to give it a try.

And I really can tell you that it is very cool. You can remotely via network see the status of each sensor (temperature, voltage..), you can reset and power on/off the computer, and also you can control your computer remotely with a VNC-like interface with the IPMIView utility that works very good. You can also access the IPMI server via web interface.

At this point you must be thinking that it is nothing new under the sun that I cant do with an expensive IP-KVM, but its not true. The really socking feature that made me say WoW! is that I can attach a drive via the network.  Yes, I can attach any ISO or floppy image to the virtual drive with IPMI, and the Supermicro motherboard will see the drive as it really was a physical drive. It will appear in the BIOS and the OS will detect it as a standard SATA drive and will boot from it or use it as the rest of drives. For the records: I have just installed Debian on it by attaching the ISO image to the virtual cdrom ;).

This feature is very useful. I can boot any ISO image without burning a CD/DVD or even without writing it to an USB stick. I simply download it on my laptop, attach it to the virtual cdrom/dvdrom with IPMIView and voila! Magically I have the cdrom in the Supermicro board. Also an image of a floppy can be uploaded and the motherboard will detect it as an USB floppy, this can be tricky for managing disasters.

How it works?

The IPMI lives in the BMC so its OS/CPU independent, even if your OS crashes and you get fatal kernel panic, IPMI will still work and you could connect to the machine remotely and reset it. This board has two Gigabit NICs, one is a standard Gigabit NIC and the other is the IPMI one.

The IPMI NIC has two MAC address, one of this MAC address is only accessible for the BMC and the other is only accessible by the CPU, so the host OS is unaware of the BMC MAC and it will only see his own MAC (the CPU one).  Then this NIC will have two IPs, the OS one and the IPMI one.

You can configure the IPMI network in the BIOS of the board to get it via DHCP or assign an static one. The first time that you power up the motherboard it will took near 2 minutes for the BMC to start up IPMI, that will not happen again if you reboot, or next time you power up as long as you don’t power cut the PSU because the IPMI code is kept running in the BMC also if the board is powered off. This is handy because it allows you to power up the board remotely via IPMI.

How secure is it?

For accessing the IPMI server you must know the password, and it supports three limited class privileged accounts (admin, operator and user). There can be various users at the same time connected to the IPMI Server and you can see who is connected at this moment and also a log is keept. Also it supports email notifications and  LDAP and RADIUS authentication. Also the traffic can be encrypted at hardware level using AES / SSL and you can upload a new SSL certificate. So I think its very secure, nevertheless is a good practice to put the IPMI IPs on a different network than the rest of your network and secure it with a firewall.

The BIOS of this board is also very complete and has a lot of options for tweaking parameters. Also includes a configurable watchdog that will automatically reset your computer if it is not responding.

So, if you are looking for a fanless eco-friendly and reliable Atom board for a home server, this one worths every penny. I am sure that you will love the IPMI KVM and the virtual disk/cdrom features. Here you have a short PPT slide show from Supermicro about IPMI.