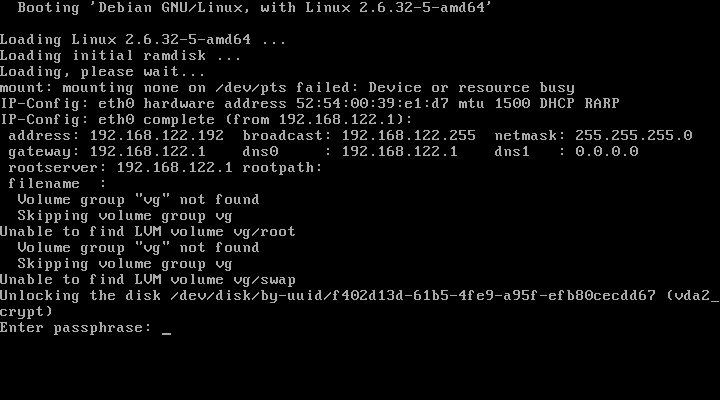
If you are thinking on sending a new server to a remote datacenter for colocation or you have rented one or more servers in the cloud, probably you have thought that you would like to encrypt your server’s hard disk.
The problem is that if you encrypt the whole hard disk (the root partition) you will need some kind of KVM to type the password remotely every time the server is restarted … sure??? No!
Thanks to this nifty trick, you can enter the password remotely during the boot process. The trick involves embedding a small ssh server (dropbear) in the initramfs that allows you to enter the password remotely for the root partition at boot time.
For those who are lucky enough to use Debian, the procedure is so simple and easy as ::
1) Install your server with the root partition encrypted.
2) Install the required packages:
apt-get install openssh-server dropbear busybox
3) Copy the SSH key that has been generated automatically
scp root@my.server.ip.addr:/etc/initramfs-tools/root/.ssh/id_rsa ~/id_rsa.initramfs
4) If your server gets the IP address automatically (DHCP) ignore this step, otherwise you have to specify the IP configuration at the Kernel boot line. To do this edit the file /etc/default/grub and define the line:
GRUB_CMDLINE_LINUX="ip=<client-ip>:<server-ip>:<gw-ip>:<netmask>:<hostname>:<device>:<autoconf>"
Using the format specified in the file Documentation/nfsroot.txt of the Linux kernel documentation. For example:
GRUB_CMDLINE_LINUX="ip=192.168.122.192::192.168.122.1:255.255.255.0::eth0:none"
Reload the grub configuration
update-grub
5) Reboot
reboot
6) And unlock remotely!
ssh -o "UserKnownHostsFile=~/.ssh/known_hosts.initramfs" \
	-i "~/id_rsa.initramfs" root@my.server.ip.addr \
	"echo -ne \"MyS3cr3tK3y\" >/lib/cryptsetup/passfifo"

And for those not lucky enough to use Debian, and also for those who have such luck, but want more details on this procedure, I am pasting here the archive cryptsetup/README.remote from Debian that I am sure that you will find very useful 
$ zcat /usr/share/doc/cryptsetup/README.remote.gz

unlocking rootfs via ssh login in initramfs
-------------------------------------------

You can unlock your rootfs on bootup from remote, using ssh to log in to the
booting system while it's running with the initramfs mounted.


Setup
-----

For remote unlocking to work, the following packages have to be installed
before building the initramfs: dropbear busybox

The file /etc/initramfs-tools/initramfs.conf holds the configuration options
used when building the initramfs. It should contain BUSYBOX=y (this is set as
the default when the busybox package is installed) to have busybox installed
into the initramfs, and should not contain DROPBEAR=n, which would disable
installation of dropbear to initramfs. If set to DROPBEAR=y, dropbear will
be installed in any case; if DROPBEAR isn't set at all, then dropbear will only
be installed in case of an existing cryptroot setup.

The host keys used for the initramfs are dropbear_dss_host_key and
dropbear_rsa_host_key, both located in/etc/initramfs-tools/etc/dropbear/.
If they do not exist when the initramfs is compiled, they will be created
automatically. Following are the commands to create them manually:

# dropbearkey -t dss -f /etc/initramfs-tools/etc/dropbear/dropbear_dss_host_key
# dropbearkey -t rsa -f /etc/initramfs-tools/etc/dropbear/dropbear_rsa_host_key

As the initramfs will not be encrypted, publickey authentication is assumed.
The key(s) used for that will be taken from
/etc/initramfs-tools/root/.ssh/authorized_keys.
If this file doesn't exist when the initramfs is compiled, it will be created
and /etc/initramfs-tools/root/.ssh/id_rsa.pub will be added to it.
If the latter file doesn't exist either, it will be generated automatically -
you will find the matching private key which you will later need to log in to
the initramfs under /etc/initramfs-tools/root/.ssh/id_rsa (or id_rsa.dropbear
in case you need it in dropbear format). Following are the commands to do the
respective steps manually:

To create a key (in dropbear format):

# dropbearkey -t rsa -f /etc/initramfs-tools/root/.ssh/id_rsa.dropbear

To convert the key from dropbear format to openssh format:

# /usr/lib/dropbear/dropbearconvert dropbear openssh \
	/etc/initramfs-tools/root/.ssh/id_rsa.dropbear \
	/etc/initramfs-tools/root/.ssh/id_rsa

To extract the public key:

# dropbearkey -y -f /etc/initramfs-tools/root/.ssh/id_rsa.dropbear | \
	grep "^ssh-rsa " > /etc/initramfs-tools/root/.ssh/id_rsa.pub

To add the public key to the authorized_keys file:

# cat /etc/initramfs-tools/root/.ssh/id_rsa.pub >> /etc/initramfs-tools/root/.ssh/authorized_keys

In case you want some interface to get configured using dhcp, setting DEVICE= in
/etc/initramfs-tools/initramfs.conf should be sufficient.  The initramfs should
also honour the ip= kernel parameter.
In case you use grub, you probably might want to set it in /boot/grub/menu.lst,
either in the '# kopt=' line or appended to specific 'kernel' line(s).
The ip= kernel parameter is documented in Documentation/nfsroot.txt in the
kernel source tree.


Issues
------

Don't forget to run update-initramfs when you changed the config to make it
effective!

Collecting enough entropy for the ssh daemon sometimes seems to be an issue.
Startup of the ssh daemon might be delayed until enough entropy has been
retrieved. This is non-blocking for the startup process, so when you are at the
console you won't have to wait for the sshd to complete its startup.


Unlocking procedure
-------------------

To unlock from remote, you could do something like this:

# ssh -o "UserKnownHostsFile=~/.ssh/known_hosts.initramfs" \
	-i "~/id_rsa.initramfs" root@initramfshost.example.com \
	"echo -ne \"secret\" >/lib/cryptsetup/passfifo"

This example assumes that you have an extra known_hosts file
"~/.ssh/known_hosts.initramfs" which holds the cryptroot system's host-key,
that you have a file "~/id_rsa.initramfs" which holds the authorized-key for
the cryptroot system, that the cryptroot system's name is
"initramfshost.example.com", and that the cryptroot passphrase is "secret"

-- <debian@x.ray.net>, Wed, 30 Sep 2009


