Tag Archives: hardware

IKEA Hackers: LackRack

Among the hundreds of hacks from the fantastic website IKEA Hackers, one is particularly interesting.

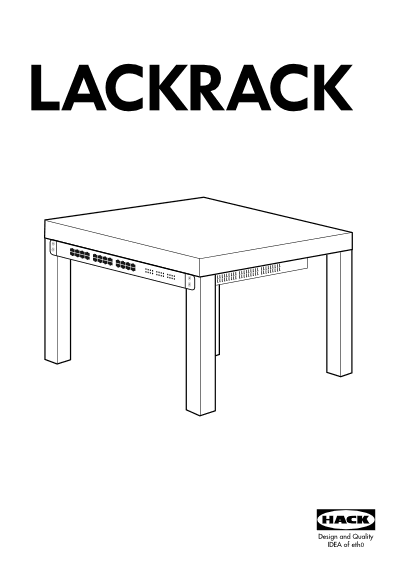
How to build a rack with an IKEA lack table worth less than 10 euros?
Well, with this manual:

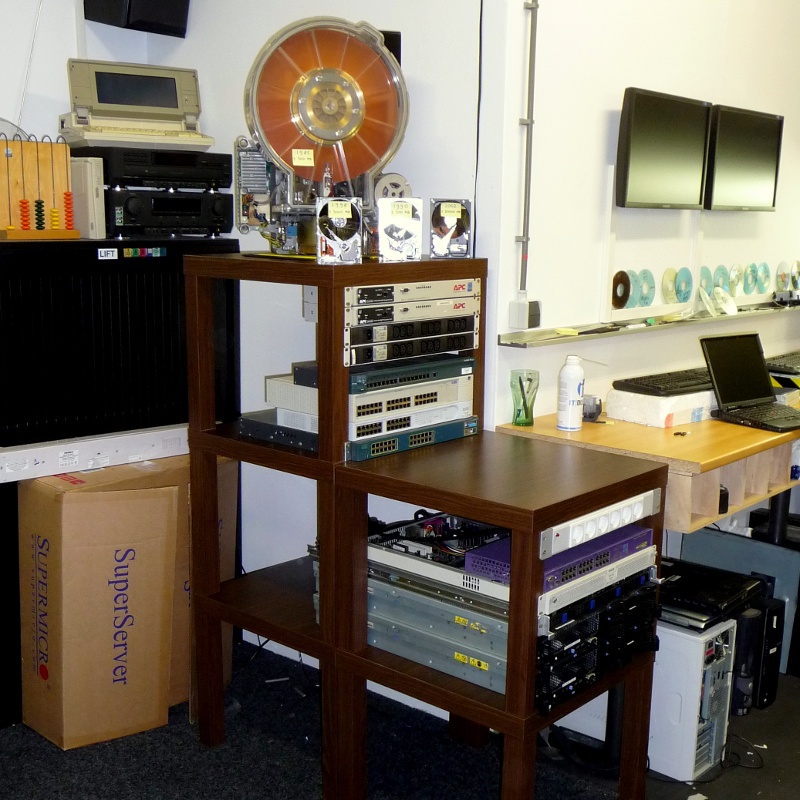
The best of the LackRack (after its price) is that its construction is modular and you can grow it with your needs:

5x LackRack

The LackRack is the ultimate, low-cost, high shininess solution for your modular datacenter-in-the-living-room. It is said that Google engineers were the first to explore the idea of using lack tables for data centers. The LackRack is so famous that even has its own website: http://lackrack.org/ 😀

OpenRISC: Making the stack 100% free

OpenRISC is the flagship project of the OpenCores community. This project aims to develop a series of general purpose open source RISC CPU architectures.

The OpenRISC 1200 (OR1200) is a synthesizable CPU core that runs on FPGAs from a broad number of vendors, and is currently being used in a number of successful industrial projects. This CPU is an open source implementation (LGPL) of the OpenRISC 1000 RISC architecture.

These days the project has reached an important milestone: they have submitted their patches for review to the Linux kernel mailing list and hopefully they will get it merged, so Linux will officially support the OpenRISC architecture.

This are exciting news!

If you have a FPGA board you can load it with the OpenRISC softcore and execute Linux on it (demo video).

But if you don’t have one, then you can try the nice OpenRISC emulator: its easy and funny.
Here is a link to the detailed howto, and here is my cheat sheet:

sudo apt-get install build-essential libmpc-dev lzop git-core
sudo apt-get build-dep gcc-4.4
mkdir ~/openrisc
cd ~/openrisc
git clone git://openrisc.net/jonas/or1ksim-svn
cd or1ksim-svn
./configure && make && sudo make install
cd ~/openrisc
git clone git://openrisc.net/jonas/toolchain
cd toolchain
git submodule update --init
# go for a coffee
export PATH=~/openrisc/toolchain/bin:$PATH
make PREFIX=~/openrisc/toolchain
cd linux
make ARCH=openrisc defconfig
make CROSS_COMPILE=or32-linux-
# go for a tea
sim -f arch/openrisc/or1ksim.cfg vmlinux

And voila! You are running a 100% free system, from the CPU to the Operating System, including the Wishbone bus :)

# cat /proc/cpuinfo
cpu                     : OpenRISC-18
revision                : 1
dcache size             : 8192 kB
dcache block size       : 16 bytes
icache size             : 8192 kB
icache block size       : 16 bytes
immu                    : 64 entries, 1 ways
dmmu                    : 64 entries, 1 ways
bogomips                : 40.00

As the OpenRISC 1000 is now considered stable, the OpenCores project is trying to build a cost-efficient ASIC with this design to get improved performance. They launched a call for donations in 2011 with the aim to produce the first ASIC in Q1 2012.

I am willing to get one of this!

The open-source methodology is here to stay, just take a look at the success story behind Linux/Android, and all the great benefits that open-source offers. We now need to take the next step with open-source hardware development, meaning to actually create “true” open-source Semiconductor components in order to stay competitive, and to make sure that smaller companies can compete with large Semiconductor giants. So please join us and help us rewrite the history books for hardware development…

Don’t eject your USB storage: stop it!

This is probably one of the biggest mistakes I’ve dragged for more time as Linux user, in part for not reading the man pages and in part by assuming too much from the name of an executable.

When working with USB storage I was used to plug it, mount it, do some stuff with it, sync, unmount, eject and unplug it. And seems that eject does not apply to USB storage, only to “ejectable” media: CD/DVD/Floppies…

So, the right way to stop an USB storage device is to use:

sdparm --command=stop /dev/device

Anyway I recommend you to check out the following script that does it very nicely, plus another useful things like unbinding it. The script is here: suspend-usb-device

PS: I’m afraid that I was not the only unwary out there that was “ejecting” the USB storage before unplugging it, so I hope you can find this tip useful hehe 😀

RFKill Applet for GNOME

I don’t like to use wireless devices if I can avoid them, I am a bit paranoid with this things and also I have empirically checked that always that I use the wireless of my laptop for a long time I end with headaches. If you are worried about this too I encourage you to watch the documentary “surrounded by waves” (just google it)

And one of the things that I miss on my Asus laptop is that it lacks of a button switch for turning on / off the wireless and bluetooh devices. Months ago I discovered the rfkill utility (package wireless-tools on Debian/Ubuntu) and I loved it. I used to disable or enable the wireless devices from the terminal with this utility, but soon I realized that it was not comfortable to open a terminal and run the commands each time.

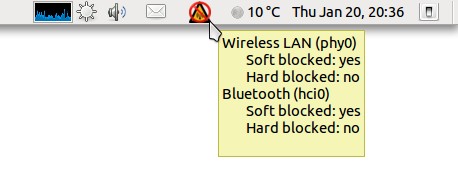
So as part of my hackfest time here at Igalia I wrote an applet for GNOME that lets the user to disable or enable the emission of radiation from RF devices with a simple click on the applet icon. I took the inspiration for this from the GNOME power manager inhibit applet.

It also polls the system for the status of the RF devices and updates the icon showed, so it works also as a notification applet that will display the emitting icon if only one of the RF devices of your system is activated and the inhibited icon if all RF devices are blocked. Finally, if a problem is found or you don’t have RF devices on your system then it will display the unknown icon.

GNOME RFKill Applet

You can get it from gitorious.

I hope you find it useful 😉

Review of X7SPA-HF : Loving IPMI and KVM over LAN

I am building a silent and eco-friendly (also electricitybill-friendly) Linux powered RAID5 NAS.  And in order to choose the CPU I read about the different low power CPU solutions and two different ones come to mind: Intel Atom and Via Nano. My first choice was Via Nano since it features 64-bit support and the wonderful PadLock engine that would allow me to get good transfer rates with crypted drives, but unfortunately, I could not find any fanless Via Nano motherboard with 4 SATA ports.

So I looked through Intel Atom D510 dual core 64-bit solutions and I found some motherboards with the specs I wanted, but one of them stood out especially on the other because it was designed by Supermicro (a server and high-end workstation manufacturer) and it has two Gigabit adapters so I can also use the NAS as a nice router/firewall.

There was two models of this board. The  X7SPA-HF is the same that the X7SPA-H but featuring IPMI with KVM-over-LAN for only 20 bucks more. I never heard of the IPMI technology so I read a little about it and finally I decided to give it a try.

And I really can tell you that it is very cool. You can remotely via network see the status of each sensor (temperature, voltage..), you can reset and power on/off the computer, and also you can control your computer remotely with a VNC-like interface with the IPMIView utility that works very good. You can also access the IPMI server via web interface.

At this point you must be thinking that it is nothing new under the sun that I cant do with an expensive IP-KVM, but its not true. The really socking feature that made me say WoW! is that I can attach a drive via the network.  Yes, I can attach any ISO or floppy image to the virtual drive with IPMI, and the Supermicro motherboard will see the drive as it really was a physical drive. It will appear in the BIOS and the OS will detect it as a standard SATA drive and will boot from it or use it as the rest of drives. For the records: I have just installed Debian on it by attaching the ISO image to the virtual cdrom ;).

This feature is very useful. I can boot any ISO image without burning a CD/DVD or even without writing it to an USB stick. I simply download it on my laptop, attach it to the virtual cdrom/dvdrom with IPMIView and voila! Magically I have the cdrom in the Supermicro board. Also an image of a floppy can be uploaded and the motherboard will detect it as an USB floppy, this can be tricky for managing disasters.

How it works?

The IPMI lives in the BMC so its OS/CPU independent, even if your OS crashes and you get fatal kernel panic, IPMI will still work and you could connect to the machine remotely and reset it. This board has two Gigabit NICs, one is a standard Gigabit NIC and the other is the IPMI one.

The IPMI NIC has two MAC address, one of this MAC address is only accessible for the BMC and the other is only accessible by the CPU, so the host OS is unaware of the BMC MAC and it will only see his own MAC (the CPU one).  Then this NIC will have two IPs, the OS one and the IPMI one.

You can configure the IPMI network in the BIOS of the board to get it via DHCP or assign an static one. The first time that you power up the motherboard it will took near 2 minutes for the BMC to start up IPMI, that will not happen again if you reboot, or next time you power up as long as you don’t power cut the PSU because the IPMI code is kept running in the BMC also if the board is powered off. This is handy because it allows you to power up the board remotely via IPMI.

How secure is it?

For accessing the IPMI server you must know the password, and it supports three limited class privileged accounts (admin, operator and user). There can be various users at the same time connected to the IPMI Server and you can see who is connected at this moment and also a log is keept. Also it supports email notifications and  LDAP and RADIUS authentication. Also the traffic can be encrypted at hardware level using AES / SSL and you can upload a new SSL certificate. So I think its very secure, nevertheless is a good practice to put the IPMI IPs on a different network than the rest of your network and secure it with a firewall.

The BIOS of this board is also very complete and has a lot of options for tweaking parameters. Also includes a configurable watchdog that will automatically reset your computer if it is not responding.

So, if you are looking for a fanless eco-friendly and reliable Atom board for a home server, this one worths every penny. I am sure that you will love the IPMI KVM and the virtual disk/cdrom features. Here you have a short PPT slide show from Supermicro about IPMI.